Friday, 23 December 2011

Superdetailed Wrecked Rhino.

 Now, before anyone says 'that's not super detailed! it looks like junk! I'm calling shenanigans!' [with as many fragments, exclamation points and whatever else you will feel is necessary.] Superdetailing is the process by which the painter adds small bits and pieces to his model to make it look more real, or give it some character.

The Rhino's right Flank. Notice that the hatch is open? 


Damage and blast holes in the front.The little golden bits? they're small brass rods - it'll be painted shining gold to represent bullets that have been lodged in the armour of the vehicle.  

Upclose, notice that the windows are now a kind of plastic, and the one window has a bullet lodged in it. Might explain what happened to the tank just before its dieing days. 

Just to assure there is plastic there, and not simply the standard mould piece. The plastic is simply a discarded specimen jar [Yes, I use them to hold models safely. don't judge me.]


Opposite flank. Notice the bullet lodges and all the gauges out of the armour - all adding up to show just what kind of punishment the poor thing is taking. 

Another example of superdetailing. See how the brass handle has been added? It seems strategically placed to allow a marine to get a good grip if he must climb up the rhino. 


The interior. The top hatches will both be open so my work will not go unnoticed. 

The little gold things are spent shell casings. In the final product, there will be a model lying on the floor, presumably having bled out. Hopefully, I'll have him reaching for a bolter that's just out of his reach. 

The empty clip helps the viewer realise that the gold things are spent shell casings. Very pleasing, in my opinion. 

the Control panel, there is a bullet lodged in the top left screen. The eerie glowing radar screen has lots of red dots - possibly enemies scattered around the sides of the tank!

Wednesday, 30 November 2011

Trygon Prime, Modifications and all ready to go.

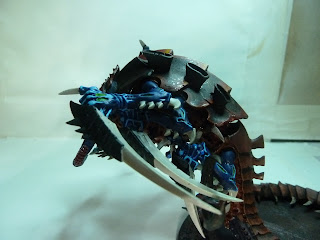
Trygon prime. Extreme highlighting on the mandibles. 

This is the almost finished product of the trygon shown here.


So far, I've only done the bits for the prime, but the basic Trygon and the Mawloc are coming. 

This is what I've done since then. 
So, I've basically done the right flank of the model now. On the left, you'll notice that the model's left flank is very closed in - almost like he's shielding his body from some attack.

On this side, the arms are positioned to make it seem like he is striking out at an opponent.


The closed in left flank.


He's still kickin'!

This is the main feature of the arms - a fully painted and fighting to the death space marine. The model forms a nice focal point, providing a grey that would not fit on the trygon himself. 

In addition, the spot colours of gold help to make the little man more noticeable, hopefully so that people will realise the immense size a trygon would have if standing bolt upright. 

Notice the smallest arm here - what could he be doing there? 
This part is probably the most subtle, but it is definantly my favourite. 

The trygon has this smallest arm facing into his body. While this seems like a small nothing to the normal player, for me and the user, it has the effect of representing the way that these trygons deal with my thunder-hammer terminators. 

All in all, I've enjoyed this project. It's a tad belated, and my friend has had to go without for a long while - something he hasn't been very happy about!

I'm not gonna be able to work on it for a few days, He's picking it up to use in a doubles tournament - I think - in which time I plan on starting some bikes.  


The power of Scout marines: Sniper rifles


So, what good are scout marine sniper rifles?

Well, for one thing, they're hitting on a 4+. which sucks right? 

doesn't it? 

Well, they're wounding on a 4+ all the time. does that suck? T10 usually takes S10 to do that. Am I really Going to waste a vindicator shot on a theoretical T10 model? 

But, that's a big 'if he has it' 

so, what makes the Scout marine so good? He certainly doesn't seem all that great. he has a low chance of wounding, doesn't he? 

No, he doesn't.

Look at the characteristics of a Scout with a sniper rifle: 
- BS3
- Wounds on a 4+ 
- Rending
- Pinning

So, sure: I am hitting on a 4+.
I am also wounding on a 4+. 

What's the likelihood that I'm going to wound with that? 
25%. 

Don't believe me? do the maths for yourself - that's against a T10 model or a T1. it doesn't matter. 
3*3 = 9
6*6= 36
9/36 = 1/4 d

So, sure. What does this mean?

1 in four will wound. 

hopefully. 

So, in a squad of 10 models, sitting holding an objective, that's 2 theoretical wounds, and it only takes one wound to cause a pinning test. 

In the end, spacemarine scouts with sniper rifles aren't great. I'm wrong. But they sure as hell are annoying. 

Consider them in an assaulty list, they'll be a target in objective based games and an annoyance in killpoint based games. 

Thursday, 24 November 2011

Trygon - modifications and all. 45% complete.

A while ago, I bought a friend a Trygon on the basis that I'd be able to paint it for him. Being a swarm player, he readily accepted. 

Sir Claudius is well and truly ravenermeat. 
At first, I only had the machination to paint the damned thing, but I was distracted by that ever shiny object - modification.


First, I added a hole. 
Truly, the hole is far too small for a Trygon, but I had the intention of making it seem like deep striking creatures were to come through the small hole created by his arrival.

The hole with paint in it

The Little ligatures are built up from Orkhide shade to Snot green and then Scorpion green.
The Blue is Necron Abyss, Regal blue, Enchanted blue and then Ice blue. 

The Trygon lurching forward
This is how I wanted the Trygon to look. The whole 'arms spread and standing almost bolt upright' look is like screaming "I'M HERE! HIT ME!" I gave him something that looks slightly more menacing to alter this silly appearance.

the shades on the tail bit are done with oil paints, It is slightly more viscous than acrylic paint, and  was easier to force into the crevices of the model. 

The magnetized head itself. Probably should've mentioned this in the beginning. Whatever. 

With trygon Prime bits, this guy has three of them. I still win sometimes, go figure.  
So, all three parts are magnetized: it can be a mawloc, a Trygon Prime or a Trygon basic. I personally like the Mawloc body, but I think the prime is the best for game purposes.


So, that's the Trygon, my latest works.

C&C if you will.


Wednesday, 16 November 2011

Predator Eagle conversion.

 Just a whirlwind bit that's been modified to fit into the Predator chassis. Unfortunately, the weapons are only forward facing, making rules developement a tad difficult.

 Magnetized weapons, so it still acts as a normal predator!
 Expected vulture missile salvo placement

A link to experimental rules

Friday, 30 September 2011

Hochland 7th, 6th battalion

The regiment in all its green-red cross glory

The free-hand number is wrong. It will become "Hochland 7th/6th" I was testing different regiment naming schemes


 My other work, The first of a unit of 5 knights of middenland. they will not be white wolf knights.
 From the side. the glassy looking armour is just gloss varnish.
yes, of course he comes off.

Thoughts?

Tuesday, 19 July 2011

My first true attempt at highlighting.

Now, don't get me wrong, I use techniques when I paint

it's just, edge highlightings never been one of them.

So, usually I get marked down on paint scores because of this little fact.

So, I've said, oh, screw it, and I've gone and painted up a new terminator, with highlights.

Without further adeiu,


I appologise for having such poor lighting, I have made a white box, which was promptly thrown out by my parents.

fun times, huh?

Friday, 8 July 2011

how to: make your own weathering powders for two dollars


hey guys, I've recently bought IA: Model Masterclass Vol. 1, and I must say, it is amazing. definitely worth the 57$ investment.

Rather than running out and buying this and wait weeks for it, I  decided I'd be clever, and make my own

So, I've decided to make my own weathering powders.

Anyway.

on with the show:


Step one: Materials
You'll need:
An exacto knife [or any sharp knife, I suppose]
A hammer
A small tub
An artists' chalk
A piece of paper towel

I assume you'll need to buy a little tub for 50c and I did buy my pastel for 1.50$.


Step 2: cut

Cut off a sizeable chunk of your pastel or chalk, and put it in your tub. 
If it takes up more than 60% of the space in your tub, it may overflow. Be warned. 


Step 3: wrap
Wrap the clod of paper up in the middle of the paper, so that it is squarely in the middle. wrap both the sides into the centre. 

Step 4: remove chunks
As it says, remove all the little chunks that will be there. use the ball or point of your hammer to do this, or even just your knife. 

Step 5: collect


And, now you have your very own weathering powder!